Arthur wrote to me in April 2021 with an enquiry about the MHR1 navigational device and then kindly wrote a guest blog about it. He then acquired a Kollsman periscopic sextant and what follows is his account about putting into a working condition, for which I am very grateful.
I have been having quite a lot of fun, and a good deal of success, running several Kollsman periscopic sextants. These instruments are not especially old and are satisfyingly well built. Of the four instruments that I have examined, I have found them to be in remarkably good working order despite the years in storage. All four have working clockwork or electronic averagers, operating index systems, and all light bulbs light up.
Of the four, one instrument had a deteriorated pellicle – Bill Morris has an excellent article on this blog that describes how to replace one. I found that transparency film is a bit easier to work with compared to cling film (food wrap), but the cling film gives a better image.
The thing that appears to be most wrong with these instruments is the sunshade carousel. Two had dysfunctional carousels which I was not able to fix properly – to make the instruments useable, I took the cover plate off and hand-rotated the shades to the “clear” position to do star sights.
The Kollsman bubbles are surprisingly long lived, with three of the four having survived from their last depot maintenance cycle dating back to at least 1985. I have some evidence that says that the issue with the one failed bubble chamber has to do with poor material selection rather than a defect in the chamber.
With just a bit of work, however, I was able to get that one dry bubble chamber working again.
Another unit would leak bubbles into the viewing chamber whenever I tried to adjust the bubble size. With a “topping off” of the fluid, I was able to make that issue disappear.
How I repaired the one dry bubble chamber is described in this article.
I suspect that there are bubble chambers that have deteriorated over the years beyond where a simple refilling of the chamber can solve the problem – the repair of those units is beyond the scope of this short article.
How to tell if there is a bubble or not
Kollsman periscopic sextants are often found on auction houses like eBay. It is quite difficult to get most layman sellers to do very much about describing the condition of the instruments they are selling, but there are a few quick ways to determine if there is a working bubble in a particular instrument and both are simple enough that most sellers are able to do them.
The quickest way to tell if there is a bubble or not is to simply set the shade carousel to position “1” and then bring the eyepiece to eye and look to see if there is a bubble. If there is, it is likely going to be much larger than you want, but if you can see it, this is a good sign and more than likely the bubble can be shrunken using the bubble adjustment knob to a workable size. Note that this method requires that there be an intact pellicle since the bubble image is brought into the optical path by means of the pellicle – if the bubble is visible in the eyepiece, then good news since the bubble chamber and the pellicle are likely in working order.
If the bubble is not visible, it may be there but not visible because the pellicle has deteriorated.
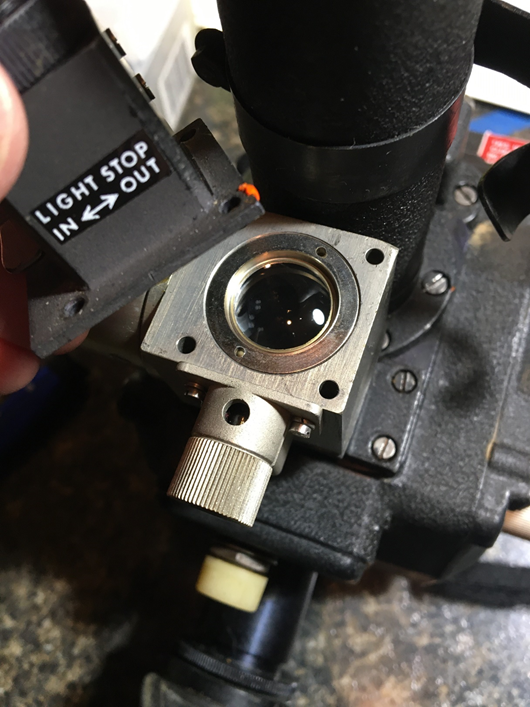
If no bubble is visible in the eyepiece, there is another simple method of checking if there is a bubble. There is a lens housing attached to the top of the bubble chamber which is used to provide a means for the navigator to a view a rotatable azimuth ring attached to the sextant mount (this provides the navigator with the means of swinging the sextant to the precomputed bearing of the object to be sighted). A more reliable method to determine if there is fluid in the chamber is to simply unscrew this lens and then set the lever on the side of the lens housing to “Diffuser Out” which then exposes the top of the bubble chamber. If you move the instrument around, you can then look for fluid in the chamber. Shining a light into the eyepiece, while you look down into the lens housing, may help.

If you can see fluid or a bubble looking down into the lens housing but not looking into the eyepiece, then the bubble chamber is likely ok but the pellicle needs to be replaced.
If you don’t see a bubble or any fluid sloshing around when looking into the lens housing, then you likely will need to fill the bubble chamber. While the repair manual for the Kollsman instrument does seem to imply that a set of fixtures with valves, reservoirs, and temperature control are required, it’s actually a simple procedure to do on a typical hobby bench.
Tools and supplies and such
To access the fill port, you will need to remove the bubble chamber from the instrument body – a good set of flat bladed screwdrivers is a good place to start but I found that a larger “precision” flat bladed screwdriver did the trick. The latter is useful given some of the tight spaces in which you are working.

A modest sized syringe is very helpful – a large bore needle is sufficient and need not be sharp. The bubble chamber is quite small so 10ml capacity is a good place to start.
Having a means of not losing the very small screws you’re about to remove is a good idea. Easiest is to clip an apron to the underside of the table at which you are working. I use bits of Velcro stuck to the underside of my various benches.
A Viton sheet or O-rings to form the seal on the filler port. I had good success with both o-rings and discs, but the manual does specify a disc rather than an o-ring. I used a simple hollow punch to make discs from the Viton sheet to fit the recess for the filling port.
Note that something as resistant to attack as Viton is not strictly necessary if using the correct fluid (see immediately below), but it does not hurt to use it.
A few ounces of 0.65 centistroke (CST) silicone fluid. Silicon fluid is non-toxic and non-flammable – I am told that it is used in common things like skin care products. This is in contrast to other clear fluids used in earlier bubble chambers that can be toxic if inhaled in large quantities. However, the very low viscosity silicone fluid does rapidly evaporate so I did this work in a very well ventilated area.
Silicon fluid also does not degrade seals unlike other fluids.
However, silicone fluid can be hard to find. A friend with far more patience than I was able to find a good source from Midwest Lubricants: Silicone Fluids (midwestlubricants.com)
Be careful to order the correct viscosity fluid – 0.65 centistroke is less viscous than water and is specified in the Kollsman repair manual. Using a more viscous fluid likely will cause issues ranging from gumming up the bellows to having a bubble that isn’t “lively” which would give erroneous and random results.
Filling the chamber
Put the instrument on a padded cloth of some sort to prevent any inadvertent bumps to the instrument and to catch small bits from falling into the maw of the Carpet Monster if you are as ham-fisted as I am.
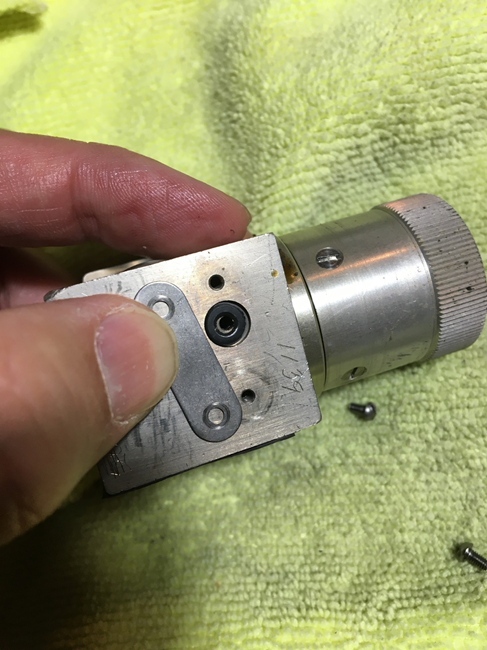
The filler port for the bubble chamber is on the rear facing side where the periscope tube interferes with access to the port. The bubble chamber must be removed to access the filler port.
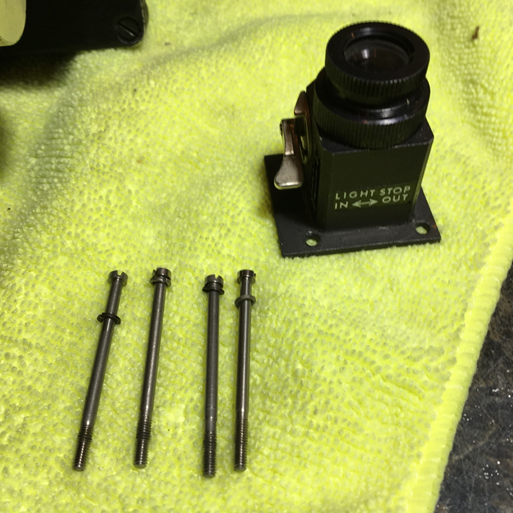
There are 4 screw heads around the base of the lens housing – these screws hold the lens housing to the bubble chamber and the bubble chamber to the instrument chassis. These are relatively long screws but be careful not to lose the washers.

A tight-fitting screwdriver blade to the screw’s slot is, of course, preferred. Take care working with these screws. Note that some instruments have screws that have been painted over – you will have to break the paint away from the screw slots to seat the screwdriver properly. An eyeglass screwdriver did this with little fuss.
The lens housing simply comes off. There is no gasket material on this side of the bubble chamber.
At this point, the only thing holding the bubble chamber to the chassis is the stickiness of a thin rubber gasket that seals the interior of the instrument from external air and moisture. Depending on how long ago the chamber was put on, it can take a bit of motivation to free up the chamber. After several moderately strenuous attempts to pull it off by hand, I used the end of an eyeglass screwdriver very carefully placed in between the chamber and the chassis and VERY LIGHTLY tapped it with a small ABS hammer and the chamber popped off with little fuss. If you choose to use this method, BE VERY CAREFUL.
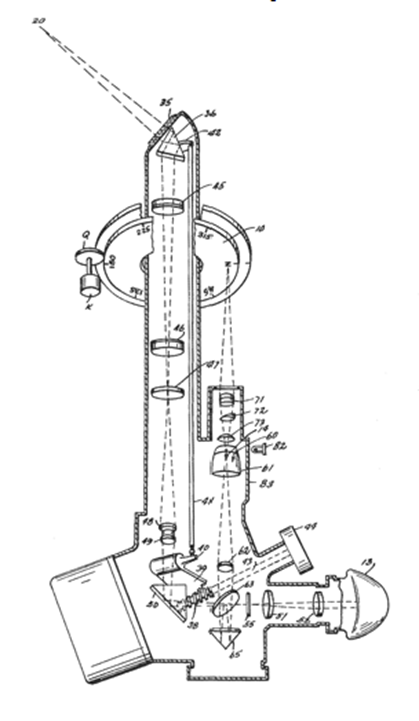
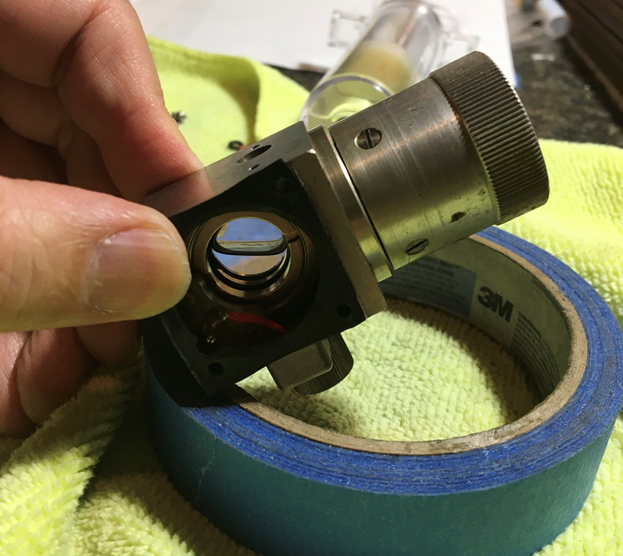
You don’t want to motivate the removal using percussive maintenance methods – looking at Figure 8, you will see that there is a small insulated tube that comes out of the chassis and fits into the bubble chamber. This is a pretty important electrical connection as it feeds electrons to the bubble illumination so don’t bust it.
Carefully remove the chamber from the chassis being mindful to not tear the gasket as you pull the chamber away.
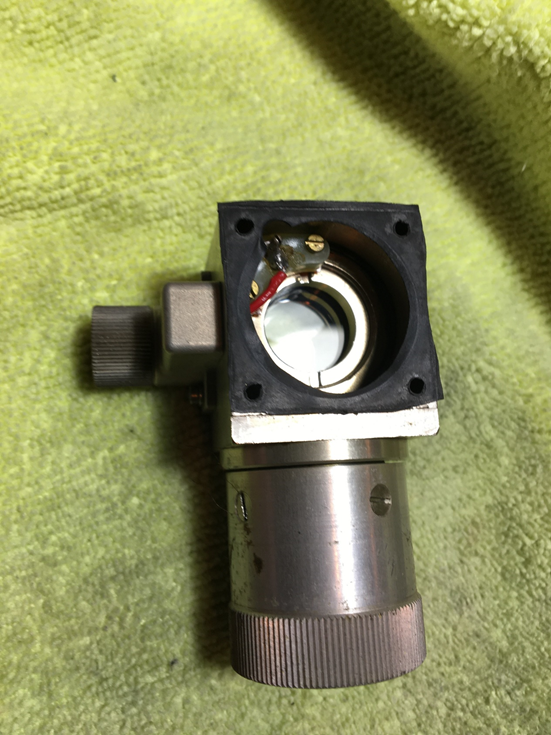
Carefully remove the gasket and set it aside. Note that there is a notch in one of the corners of the gasket that lines up with the socket that brings electric power to the lamp attached to the chamber. You will have to reinstall the gasket with the correct orientation when it comes time to put the chamber back onto the chassis.
I then used a bit of blue masking tape to cover the resulting hole in the instrument – this particular instrument has an intact pellicle so it felt better to cover the hole than to not.

In the next image, we see the cover for the filling port. This cover is up almost against the periscope tube when the chamber is on the chassis.

Here is the filling port exposed after removing the cover.
In this image we see that, at the previous servicing, an o-ring was used to seal the port. The maintenance manual specifies a disc. The o-ring, tho still pliable, was completely flattened. This is where I suspect the chamber leaked.
Not knowing better, I originally used a Viton o-ring to replace it. The dimensions of the o-ring I used was 2.90mm diameter x 1.78mm thickness and it worked fine for at least a month. I eventually replaced it with a Viton disc made from a sheet 1/16” thickness Viton and a hollow punch.
A test fitting of the disc indicated that it was only slightly taller than the hollow around the filling port. I punched a second one and then thinned it using fine sandpaper. My plan was to stack them with the unsanded disc on the port and then the sanded disc on top of it to provide tension to seal the port under the cover.

To fill, I used a syringe with a large bore needle, but injecting it directly into the port just resulted in silicone fluid flying about.

The procedure takes a bit of time at this point. I would add a bit of fluid to the port letting surface tension of the silicone fluid hold the fluid at the filler port. I would then put the syringe down and rotate the bubble adjust knob so it sucks the fluid in – then I would rotate the knob in the opposite direction so fluid would start to come back out of the filler port, reverse the knob again a bit tiny bit, then add a bit more fluid. Repeat many times.
Sadly, as I write this, I cannot recall if I rotated the knob towards the “Bubble Increase” or opposite direction. You will quickly figure it out, however – if fluid comes out, turn it the other way!
At some point, the bubble looked like this and I was not able to get any more fluid into it:
As shown, this is about as full as I was able to get it using the syringe and working the knob. However, this does not indicate failure.
The bubble adjust knob has a bellows – what I did at this point is seal the fill port with the discs and then the cover plate and screws so I could see if I could form a smaller bubble. To do this, follow this procedure:
- Hold the chamber level as though it was on the instrument (bubble adjustment knob to the left and light bulb housing pointing towards you)
- Turn the bubble adjustment knob so it reaches the stop at the “Increase Bubble” direction (full clockwise rotation until it reaches the stop)
- Tilt the chamber ~70⁰ to the left (so the knob is pointing down and left, light bulb housing still pointing towards you)
- Turn the knob slowly (or quickly – you may need to experiment) away from the stop (counterclockwise) until it hits the opposite stop. If things are going well, you should see the bubble start to shrink.
- Repeat from step 1 as necessary.
In normal operation, this is how one shrinks the bubble. By rotating the chamber with the bubble adjust knob pointing down and left, the bubble is up against a notch in the chamber which leads to the bellows assembly in the knob. Moving the knob counterclockwise siphons gas into the bellows shrinking the bubble. However, the bubble must be in the notch for the gas to be pulled into the bellows.
You may need to repeat the process several times – first level the chamber again, then move bubble adjust knob to the “Increase Bubble” stop, tilt, move the knob to the opposite stop.
After a few cycles of this, I got:

Doing the shrink bubble procedure a few times, I was able to shrink the bubble to nothing so that it looked just like Figure 11! If you do this, do not fret – by redoing the procedure above but moving the knob towards “Increase bubble” instead of away, you can create a bubble.
It is a good idea to store the sextant with the bubble adjustment knob set back to the “Increase Bubble” stop – this is the preferred position when not actively using or adjusting the bubble.
I rechecked that the plate on the filler port was snugged down with the Viton discs in place under it and, at this point, all that is left to do is re-assemble the bubble chamber and lens housing to the chassis.
Make sure to clean the top lens of the bubble chamber.
Getting the gasket back on is a little fussy. First, make sure it has the correct orientation so that the notch in the gasket clears the electrical contact area. What I eventually did was put the lens housing back onto the bubble chamber, then put the screws thru the two, then put the gasket onto the protruding screws.

Then it is a relatively simple matter to just align the screws to the holes on the chassis and carefully snug them down.
Closing remarks
Note that, as seen in Figures 13 and 14, there is still a fair amount of air still in the chamber’s bellows when I reached the point where I could not get more fluid into it. I do not know if this can be reduced using a different procedure, so if anyone does know I would love to hear about it. The method described above does work well enough to make a bubble allowing the sextant to be used.
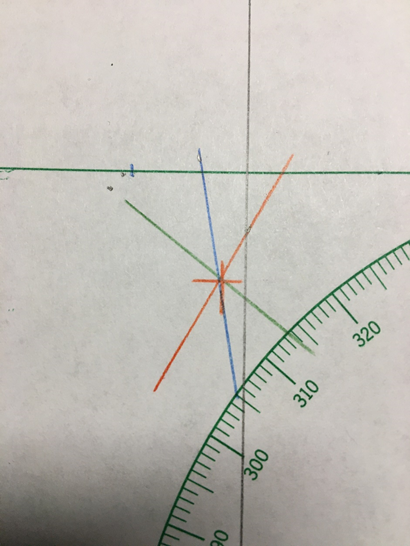
Because I pulled the bubble chamber off and the gasket is non-uniform, I needed to re-establish the instrument’s index error. Using a custom 3D printed mount on a tripod, this is a quick process – because of the stability on the tripod, the bubble can be held still which makes for very accurate results.

The bubble chamber I refilled still seems to have retained its bubble after 6 months – it allows me to shrink the bubble to do star shots and expand the bubble to do Sun shots and, quite agreeably, the bubble has not disappeared.
It may well be that I have seen only exceptional bubble chambers free from defects other than the filler port seal – this article only addresses the refilling of the chamber, not other repairs that may be necessary. These Kollsman sextants can be very accurate, even with the 50+ year old clockwork averagers. Here is a representative 3-star fix taken with this repaired sextant and its attached clockwork averager:

And a fix that looks like this is not uncommon:
These Kollsman periscopic sextants are robust and quite capable of taking very accurate fixes from places far from a sea horizon or in the full darkness of night. It is a shame to see these instruments gathering dust especially for something, like a leaking filler port seal, that turns out to be relatively easy to fix.
Arthur Leung
North Carolina, USA

Leave a comment