Sounding sextants 3

16 07 2009

Hughes and Son Double Sounding Sextant

A post on another  obsolescent navigation instrument seems to be apt, against a background of a newspaper report from Honolulu: http://tinyurl.com/m8nvxd  According to the report, in February this year a 9,600 guided missile cruiser, the Port Royal, ran aground at night near the entrance to Pearl Harbour. The causes were complex, but could perhaps be summarised as “When the modern navigational systems broke down or gave conflicting results, noone looked outside the ship in an attempt to fix its position.”

A double sextant, not to be confused with the reflecting circle, allows almost simultaneous horizontal angles to be measured between three objects. By applying the results to a station pointer (sometimes called a three-arm protractor), a fix can very rapidly be plotted on a chart. The speed with which this can be done is particularly useful when the vessel is travelling at speed. I have updated the account of fixing by simultaneous horizontal angles in the first post of this series, Sounding sextants 1.

Early double sextants from the first half of the nineteenth century had two index arms rotating about the same axis on a quintant, with one vernier reading on the inside of the limb and the other reading on the outside of the limb. By the third quarter of that century, Henry Hughes and Son were making double sextants in which the frame was circular. Double sextants from any period rarely come on the market and do not seem to be sought-after. Nevertheless, I was pleased to be almost the only bidder for a Hughes double sextant dating from 1951 or 1952.

The layout has not changed from the C19 version, but the 1950s instrument has an alloy rather than a bronze frame, is provided with micrometers, and has a telescope with an interrupted thread  to allow it to be deployed rapidly. The form of the mirror frames and the handle remain the same. This photograph gives the general arrangement:

GA1

The aluminium alloy frame of about 86 mm radius is in the form of a three spoked annulus with two lengths of rack on the periphery, and is held in the hand by means of an octagonal plastic handle that screws into the hub. The worms of two micrometers at the end of alloy index arms engage with the racks. The zeros of the scales of degrees are set 140 degrees apart. The narrow mirror of each index arm rotates independently about the centre of the instrument and the x2 by 30 mm Galilean telescope looks past their left hand edges at the middle mirror, which is about 35 mm square. This is unsilvered in a middle horizontal strip, so that the user has a direct view of the central object and reflected views of the right and left-hand objects. The mirrors are provided with adjusting screws which have screw-on protective caps.  The next photograph shows the layout, with the index mirrors set at micrometer readings of 60 degrees.

GA2

A feature of the mirrors not apparent from the photographs is that tiny discs of brass have been glued with shellac to the backs of the mirrors where the adjusting screws bear. The whole of the back has then been coated with a thick layer of varnish to seal the silvering. This is an approach that I imitate when restoring sextant mirrors, as the silvering often begins to deteriorate where the protective paint or varnish coating has been damaged by the point of a screw.

The next photograph shows a view of the underside of the instrument. The form of the handle is unchanged from 75 years previously.

Handle

As the sextant has a radius of only 86 mm it is possible to have micrometer drums of a useful size without having to have a conical worm in order to have the thread tangential to the rack while the worm axis is offset. In turn, having a cylindrical worm allowed Hughes to put into practice their 1929 patent (U K Patent number 309,648), in which the worm swings on a swing arm chassis out of the plane of the rack when the release catch is operated. The more usual arrangement in sextants is for the swing arm chassis to pivot in the plane of the rack. The next photograph may help to illustrate the Hughes arrangement:

Swing arm

The micrometer drums are pinned on to the worm shafts and the plastic of which they and the indexes are made is of a dark brown colour rather than a more pleasing black. Possibly they were originally black and have deteriorated over the years. They are divided into minutes and, despite the ample diameters of the drums, the scales seem inexplicably crowded.

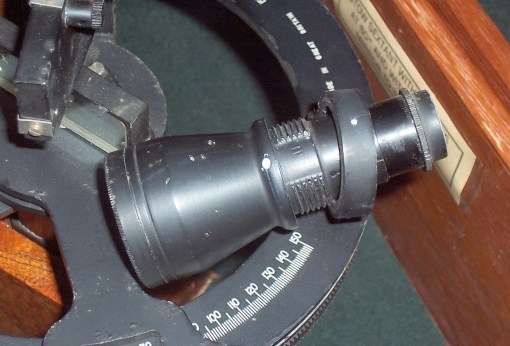
The telescope can be very rapidly deployed. It has a relatively coarse interrupted thread. One has only to line up the white dots on the telescope and its mounting and rotate through less than an eighth of a turn to secure it in place. It is focused by sliding the eyepiece draw tube.

Scope thread

 The sextant came to me without a case, so my first step in its restoration was to make a new case for it. I used the tropical hardwood, kwila, for the carcase and sapele, sometimes called African mahogany, for the internal fittings. I followed Hughes’s practice of placing the handle on the side of the box, so that it can be set down without damaging the hinges, and of arranging the latch hooks both to point to the floor when the case is being carried. The joints are box dovetails, not a 1950’s practice, at which time comb joints were the norm.

I plan eventually to strip the paint off the sextant, deal with the small areas of corrosion and repaint it.

100_2891


A Worm Turns

6 07 2009

Recently, there was a wide-ranging discussion on NavList about how accurately it was possible to measure star-star angular distances using a sextant. It took in the physiology of vision, the resolving ability of telescopes and, my contribution, the ability of the sextant to measure the angles with accuracy.

 An inspection certificate that gives the errors of the instrument every fifteen or twenty degrees is of limited use. When one looks at many of them, it is apparent that there is often no obvious pattern to the errors, making it unsafe to interpolate. In addition, they are always given to a whole number of degrees, so in effect they are assessing only dividing and eccentricity errors of the rack, and ignore the micrometer.

 This led me, out of curiosity,  to calibrate a number of micrometer sextants, ancient and modern, at intervals of five minutes over a whole rotation. The results tell us about the micrometer screw or worm, and dividing and eccentricity errors of the micrometer drum. The latter would have to be very gross to have a significant effect on the micrometer reading. For example, if the drum were mounted 0.04 mm eccentric, say by loose fitting on the shaft (and it would be a very noticeably slack fit), a reading would be 0.2 degrees in error on a drum of 40 mm diameter. As the drum is divided into 60 minutes, this would be 1/30th of a division, a negligible amount. Thus, we may ascribe most of any error to errors in the worm.

 A progressive error in pitch of the worm is when the pitch of the thread is larger or smaller than it should be. It can generally be discounted, given the short length of worm in engagement with what is in effect a very long partial nut, the rack. An error will result if the axis of the worm is parallel, but not coaxial with its bearings and a much greater error if the axis of the worm is not parallel with the axis of its bearings.

 A more difficult error to assess by examination of the micrometer readings is periodic error of the worm thread, in which the pitch varies periodically along the length of the thread at regular intervals over a single rotation. This is generally due to errors in the leadscrew bearings of the lathe that produced it. Combine the various sources of error and it can be very difficult indeed to sort them out, still less to correct them. In general, the best cure for a defective micrometer worm is to replace it!

 With this in mind, I set about calibrating some sextant micrometers. This is a relatively simple matter using an autocollimator. This instrument shines the image of a cross wire onto the index mirror and measures by how much its reflection is deflected on its return to the instrument. A typical instrument gives a readout on a drum with least graduations of 0.2 seconds and has a range of 10 minutes, so three steps are necessary to calibrate a sextant through a whole rotation of the micrometer (recall that a change in 1 degree readout of a sextant represents a rotation of half that amount of the index mirror).

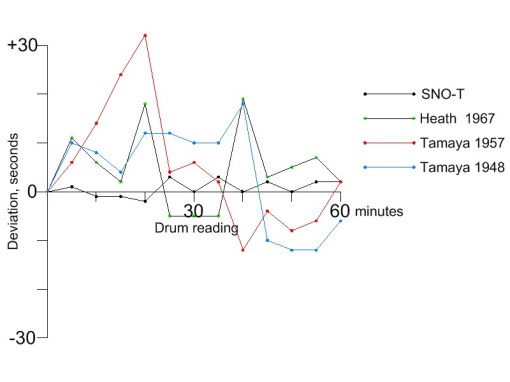
 The first sextant I tested was a 1982 Soviet SNO-T. These superbly constructed instruments seem to be undervalued, though they were quite possibly the best sextants ever produced. The graph of its micrometer error, shown in black below, is well within the 6 seconds allowable by its specification.Drums 1The next was a forty year-old veteran by Heath Navigational. While not quite in the same class as the SNO-T, the results were nevertheless acceptable. A Tamaya from 1948 was just acceptable except at one point. More surprising was the graph of a much younger Tamaya, apparently in good condition, with errors of up to half a minute. The failure of the graphs to “close” back to zero or indeed for the graphs to be identical over two rotations should not be given too much significance and is accounted for by stick-slip or “stiction” in the bearings and at the worm-rack interface.

 The worst was a 1937 Husun, with large errors that varied wildly. This led me to examine the worm with a stereo microscope and it was apparent that at some time the worm had been dragged across the rack, leaving burrs on the crests of the thread. This in itself is not necessarily a major problem, as threads should engage on the flanks of the rack teeth, not on the tips, and burrs can be carefully filed off. After I had  done this, the errors were still present and on examining the worm with the microscope, I could see it moving slightly out of engagement with the rack at one point as it rotated, suggesting that the worm and its bearing were not in line. There was slight run-out of the drum as well, confirming the impression that at some time the the shaft had been bent and repaired, albeit imperfectly. The solution was to replace the worm and its shaft.

 After seventy years, spares are not of course to be had, so I had to make a new one. To ensure concentricity and correct alignment of the axes of the worm and its bearings, they ideally have to be turned between dead centres. These are 60 degree cones that fit into suitably shaped holes in each end of the work piece. While there are special lathes in which neither centre rotates and the workpiece is rotated about them, nearly the same results can be obtained by turning a centre cone on a piece of steel held in the chuck and driving the workpiece with a “dog” that engages with one of the chuck jaws. This ensures that the centre does not describe a little orbit that would be reflected on the workpiece, if the centre were not absolutely true. The other end is supported on a standard dead centre held in the tailstock of the lathe. The next  photograph shows the idea.

Dog

The parallel bits involve straightforward turning and fitting. The opposed 45 degree cones that form the thrust surfaces are easiest formed by using a 90 degree form tool, taking a little off one of the faces until the bearing fits exactly when assembled around it.

cones

The conical screw thread, however, can only be cut using a taper-turning attachment. This is a bar at the back of the lathe set at the required angle and it guides a follower slide that is attached to the cross slide, so that the tool follows the angle of the bar to produce a tapered workpiece. Screw cutting is otherwise as normal except that the tool axis is at right angles to the surface of the cone rather than to the axis of rotation. The top slide is used to put on cut.

taper attachment

 The gears between the rotating headstock spindle and the screw that moves the tool along are selected to produce the correct pitch of thread. For example, if the gear ratio is one to one, a screw of the same pitch as this leadscrew will be produced. If the gearing is three to one, then the cut thread will be one third of the leadscrew’s pitch. The Husun worm is of 18 threads per inch, one provided for by the gearing of most lathes with an imperial lead screw.

As asides, some turners may not know the trick of wrapping a slender part with some lead wire, in this case, multicore solder, in order to reduce the tendency of slender parts to chatter. Another tip is to grind a flat  on the tail centre, prior to aligning the tail stock to turn parallel, so that it is always replaced in the same orientation used during alignment.

Conical worm

The last picture shows the before and after results.

New and old worms

Finally, graphs showing the before and after calibration results:Drums 2It is not possible to say when variation arises from imperfections in the screw thread itself and when it arises from stick-slip, but I am sure all would agree that the results are much better than before. None of these results, except those for the SNO-T, which are excellent, should be seen as reflecting on a particular make of sextant. The SNO-T had been well used and showed it, as did the Husun. Apart from verdigris on the brass screw heads, the Heath looked near-new. The older Tamaya I suspect had not been used since its importation into the USA after WW II by a returning serviceman, while the younger one had, to judge by the battered state of its case, lived in uncertain times. 

Ideally, when buying a second hand sextant, you should examine it before buying. In the context of this post, first check that the rack and worm are clean and free from dried up oil and dirt. If there is a cover over the worm, ask the seller to remove it for you. Then rotate the micrometer drum slowly by hand over several rotations, while you feel for irregularities in drag. Examine the whole of the worm’s thread closely with a hand lens to look for nicks and flats (to get the best out of a hand lens, you should place your eye against the lens and bring the object into focus by moving the object, not the lens). Then look at the interface between the rack and the worm as you turn it. If you see the thickness of the oil film varying, or worse, see a gap developing and fading, as you rotate the worm through a full rotation, you may take it that the worm is bent on its shaft. Of course, you should check the rack too, as well as the other bits, but that’s for another story.

I don’t make or restore sextants for a living, but the Internet has made it easier to make friends in distant lands, while living in an isolated corner of an isolated country in the South Pacific, so I am sometimes able to help out by making or mending parts, though not for gain. I have no formal engineering qualifications, so think of me as an engineer of last resort before contacting me about  a lame sextant!