Mercury amalgam mirrors

6 05 2021

For years I have wished to reproduce the method of re-silvering sextant mirrors using the process which was common until the mid 19th century, when chemical methods of depositing silver on to glass were invented. For several centuries prior to that, tin foil was dissolved in mercury to form a two-phase amalgam of tin-mercury crystals. A ready source of tin foil used to be tea chests, but if they exist at all nowadays, they will be lined with aluminium foil, which does dissolve in mercury but immediately decays to an oxide-rich powder.

For a sextant mirror, only a few drops of mercury are needed and high purity tin foil can be obtained in small quantities from China on e-bay. Mercury metal is fairly harmless stuff in itself, but its vapour poses health risks and many of its organic compounds are very toxic. For our purposes, we do not need to wear personal protective equipment, wear rubber or nitrile gloves as well as protective eye wear, nor do we need to use respirators with cartridges approved for use with mercury vapour, as the amount of vapour released by the tiny amount we need must pose negligible risks.

Mercury metal is a bit hard to get hold of, as many carriers refuse to handle it because of its highly corrosive effects on aluminium and often groundless health fears, but an old mercury in glass thermometer or two may contain all we need. I am fortunate to have been given a litre by a retired chemistry teacher who had received several litres of it when an old DC power station closed down.

The first step is to remove the old silvering. Classically, it was coated with sealing wax, which is mainly shellac with a colouring substance, so it can be soaked overnight in alcohol and then rubbed off with a finger. The old silvering may come away with it, but if not, it can be dissolved in concentrated hydrochloric acid, often sold as “spirits of salt” for cleaning concrete. The vapour from fuming hydrochloric acid is irritant, so cover the container while the mirror soaks. The glass can then be thoroughly cleaned with alcohol to remove all traces of oil or grease.

The next step is to smooth a piece of tin foil about the same size as the mirror with a margin of a few millimetres all round. This can be done on a smooth glass or other clean surface, using the finger tip or a scrap of chamois (“shammy”) leather (Figure 1).

Once this is done make sure it has not stuck to the glass. I then transfer it to a piece of cartridge paper with folded-up sides to catch any stray mercury.

Figure 1: Smoothed foil.

Then add a drop of mercury and spread it evenly over the foil with a finger tip to give a brightly glistening surface . Add another drop of mercury, to give an excess, which brings any dross of mercuric oxide and dust to the surface (Figure 2).

Figure 2: Mercury excess.

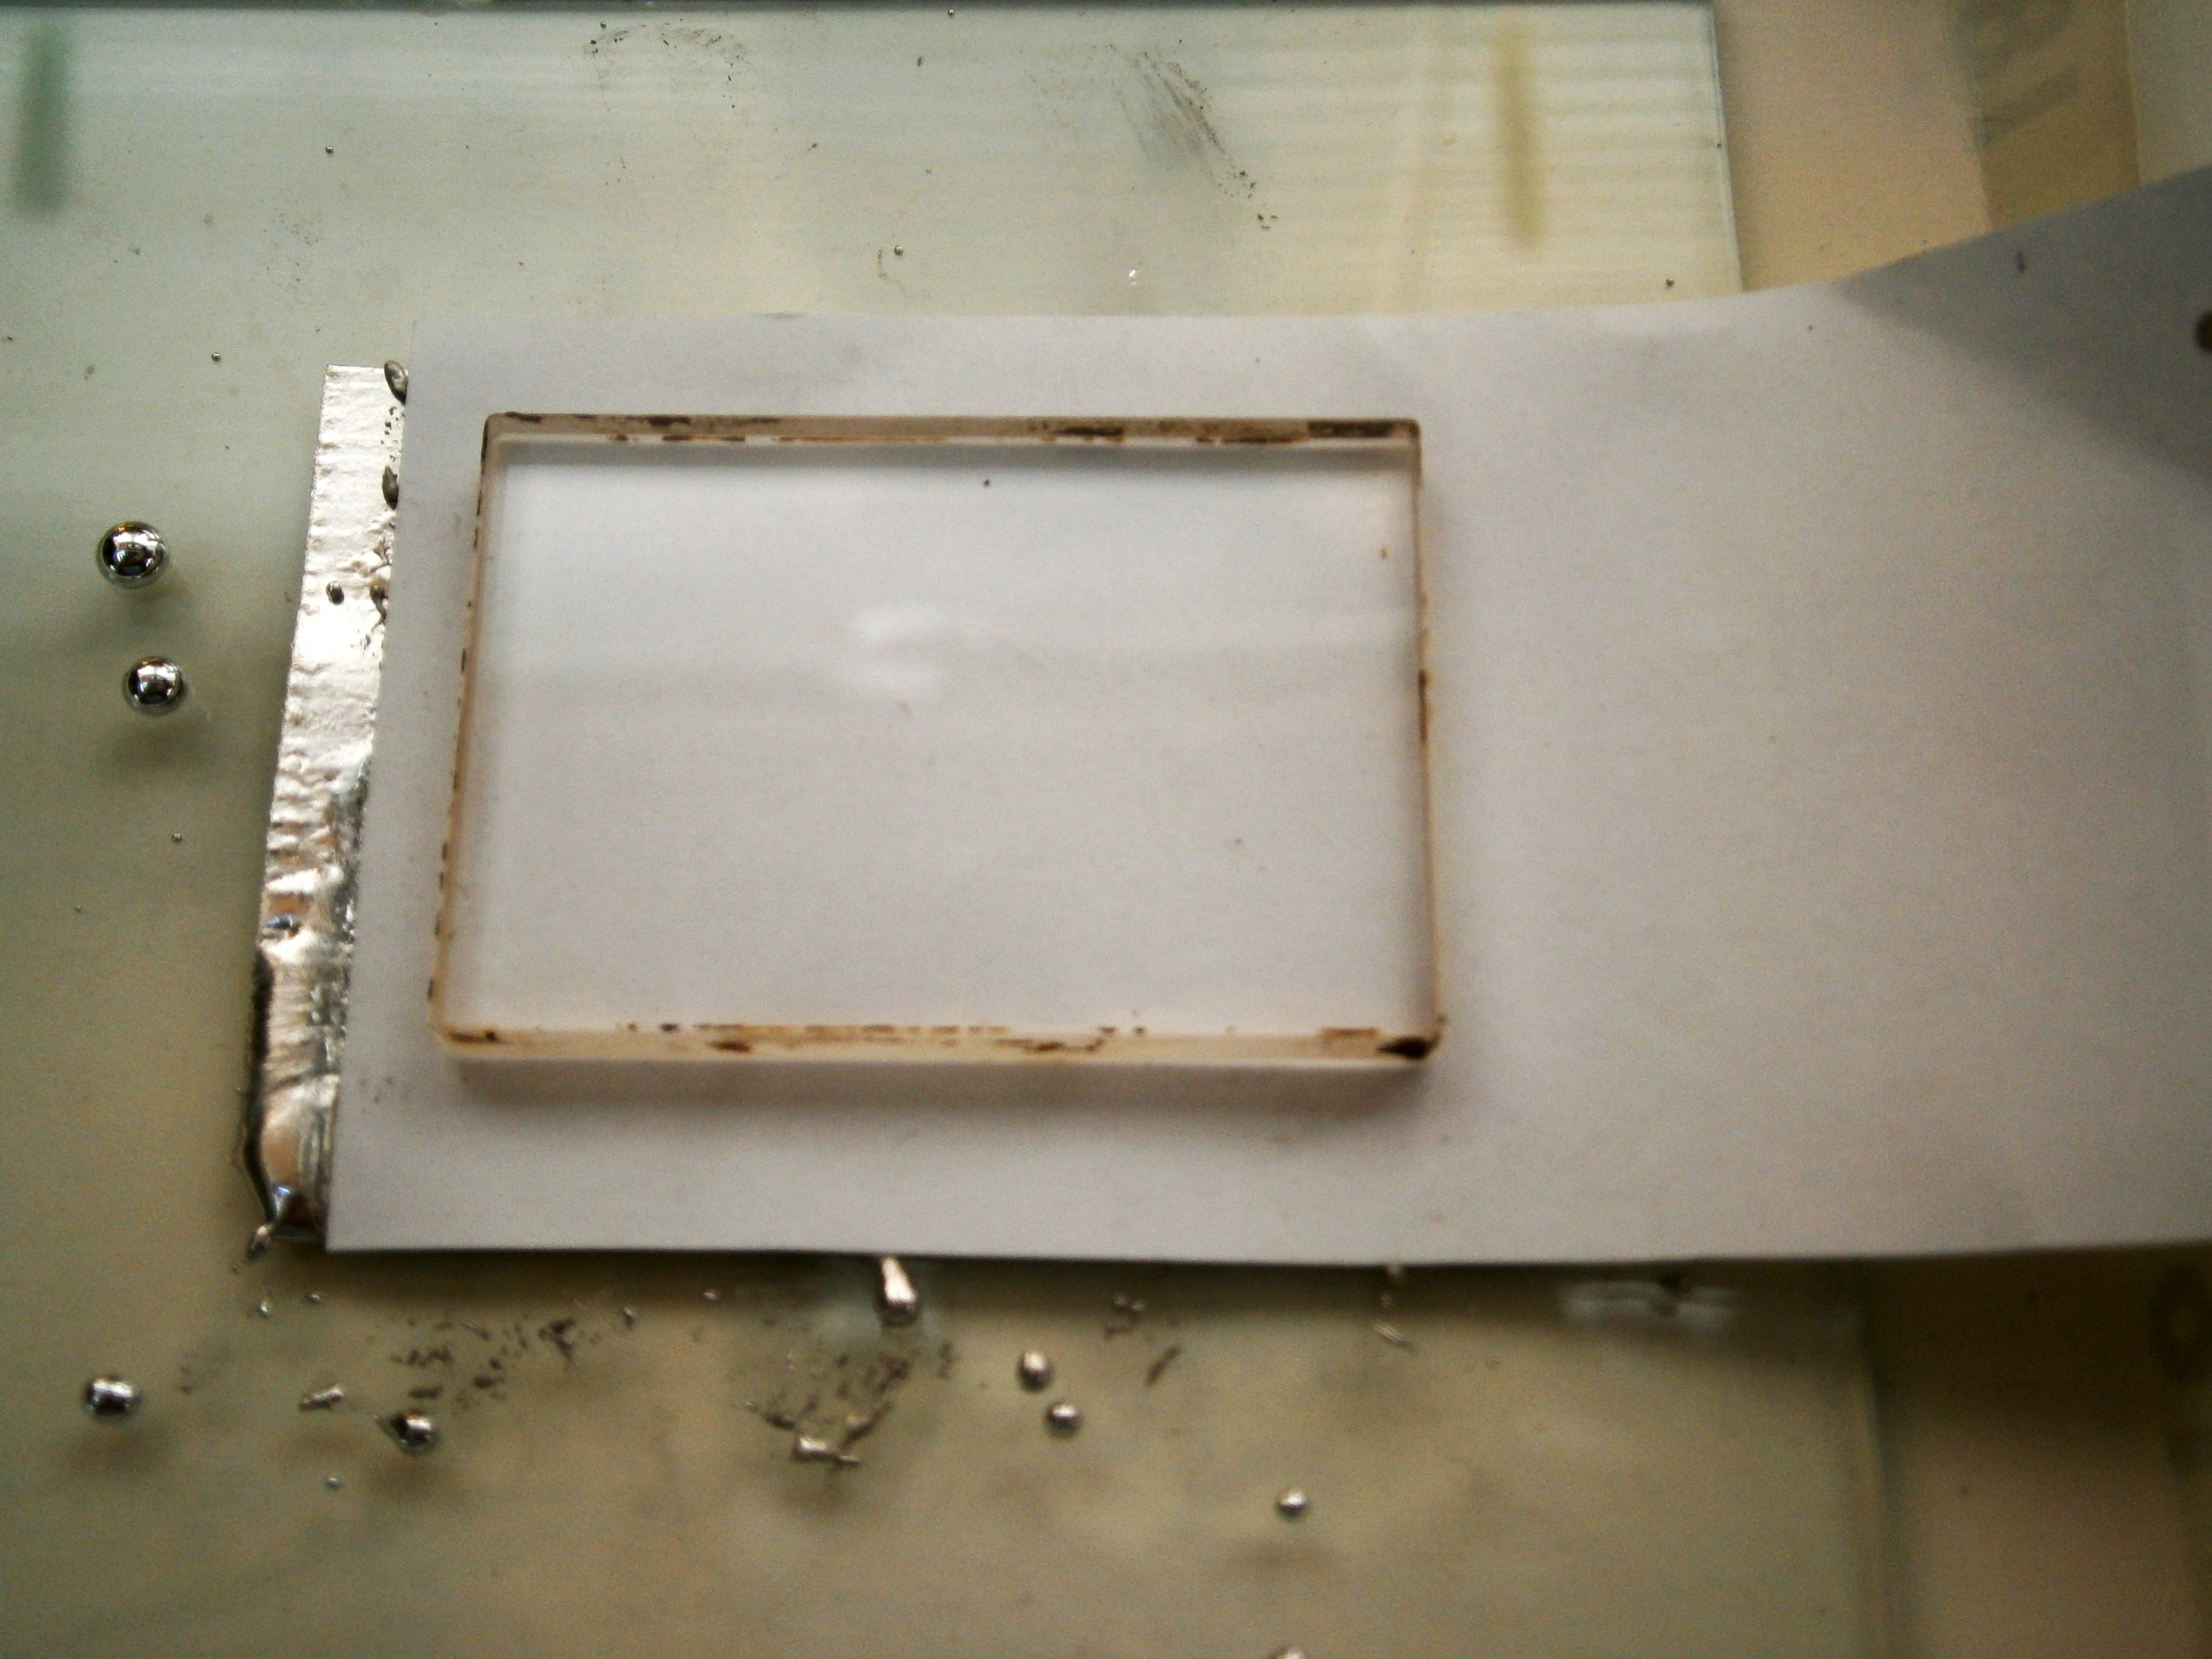
Then place a slip of clean paper on top of the mercury, followed by the glass and holding the glass with a light downward pressure, slide out the paper and, with luck, the dross (Figure 3).

Figure 3: Removing dross.

Tilt the glass and let excess mercury drain off ,steadying it so that it does not slide off (Figure 4). Note the brightly reflective result.

Figure 4: Draining mercury 1.

The mercury tends to collect at the bottom edge and can be encouraged to drain by adding a slip of tin foil (Figure 5).

Figure 5: Draining mercury 2.

At this point, I slide a slip of paper between the foil and the glass substrate to prevent the two from sticking together, and allow a day or so for all the mercury to drain away. Though now containing tin, it can be collected in a separate vessel and used again if one does much silvering. Figure 6 shows the back of the new mirror after trimming excess tin.

Figure 6: Mirror back.

And Figure 7 shows the front. Tin is less reflective than silver, but the eye can just about detect a doubling of brightness, and I certainly cannot detect any difference between modern mirror glass and the few ancient sextant mirrors I have renovated.

Figure 7: Mirror front.

I use acrylic paint to protect the back and continue the paint around the sides to ensure a waterproof seal. If “authenticity” is desired and you can find sealing wax you can dissolve it is “spirits of wine” (alcohol) and use that as a sealant, or colour some shellac.


Making circular sextant mirrors

27 03 2011

C Plath probably set the fashion for round sextant horizon mirrors in the late 1930’s and the fashion, which is very logical, was copied by Tamaya in Japan, while British and American makers kept to rectangular mirrors. An exception was the Admiralty pattern sextants made by Hughes and Son pre-WWII and Kelvin and Hughes post-war for the Royal Navy. A round mirror intercepts a little more of the light from the index mirror but is rather more difficult to make and more expensive to replace. It is, however, easier to make in a sealed version in a watertight cell, which is what the Admiralty wanted

Amateur telescope makers have long known how to cut round sections of glass. Relatively thick mirror blanks 250 mm and more in diameter can be cut using only hand tools, grinding paste and a lot of exertion. Recently, I developed a method for sextant mirrors that cuts out the exertion, but does require access to a drill press or vertical milling machine. Though it could probably be adapted to the lathe, most lathe owners will also have at least a drill press. I make no claims for originality. The stimulus to develop the method arose when my friendly local glazier found his equipment could not cope with mirrors of only 56 mm diameter.

The glass used is standard 4mm thick mirror float glass. A piece about 200 x 300 mm costs about NZ$9. To cut out circular pieces, you need a sort of trephine, a tubular tool with a cutting edge on the end. The cutting edge is composed of grains of grinding powder that embed themselves in the softer material of the tool and slowly cut away the glass. A slurry of the powder in oil also widens the cut a little as the tool rotates, and prevents it from jamming in the cut. The better centred the tool is as it rotates, the less chance  the workpiece, our mirror blank, has of oscillating  from side to side and perhaps spoiling. Figure 1 illustrates the trephine that I made, but other improvisations are of course possible.

Figure 1 : Grinding tool

(Non-turners can skip this paragraph) It could have been turned from the solid, but as an amateur I dislike producing unnecessary swarf, so I fabricated it from three separate parts. I glued the spindle into the cross bar and turned the outside of the bar down to fit into a seat turned in the end of a piece of scrap, thick-walled tubing. At the same setting, I  turned down the outside of the tube at the spindle end to form a fairly true seat, for holding the tube in the chuck for the relatively heavy turning required to form the diameters of the business end. When the business end was nearly to size, I fitted the collet chuck to the lathe, held the workpiece by the spindle and took the necessarily light cuts on the cutting end of the tool, to bring it to finished size.

This accomplished without disaster, the next step is to prepare the mirror blank, by cutting out a square that will provide the mirror with a generous margin of about 15 mm. If one simply grinds through the blank, there is a tendency for the edges to chip and splinter as the tool breaks through, so I glued a piece of ordinary glass to the underside using Araldite and ground through both. It is not of course necessary to go all the way through the sacrificial glass once it has done its job of supporting the edge of the mirror. Once the glue has set, a few pieces of masking tape provide some protection to the upper, silvered side of the mirror from stray particles of grinding grit. I have tried the classical glass-workers cement of 50 percent beeswax melted together with an equal quantity of rosin, but found that the heat generated by the grinding sometimes caused the cement to let go. Shellac flakes melted on the glass at about 180 degrees C in an oven are better, as the melting point of Araldite is very close to the temperature at which the mirror coating lets go of the glass. Note: I now use only flake shellac and heat the glasses on an upturned domestic electric iron.

The blank with its sacrificial underpiece of glass can now be attached to a piece of flat material such as medium density fibreboard (MDF) using a few nails hammered into it and bent over a little to grip the sandwich. If you are uncertain about how well-centred your tool is, leave the glass a little freedom to move from side to side. My tool is well centred, so I leave no freedom, and firmly attach the MDF to the table of  my mill-drill as shown in Figure 2.

Figure 2 : Grinding set up.

It is as well to protect the machine from stray particles of grit using sheets of newspaper in preference to rags, as the former tear and do not pull in hands if caught on the rotating machine spindle. Once set up, the tool is annointed with a thin paste of fine grinding grit in oil and the drill  started. Most people will find it hard to buy grit on its own, but auto supply shops will have valve-grinding paste that can be thinned with light oil; and and 180 rpm seems about right for the speed. Update: fairly coarse (eg 30 micron) diamond paste is much quicker. The tool is fed downwards until it is heard to be grinding and then released, repeatedly raising and lowering, with the grit progressively working its way through the glass. If the soft swishing sound of fine grinding  disappears, seizure may be imminent, so add more oil and, from time to time, more grit. It is hard to see through the edge of the glass when you have gone right through the mirror and a little further into the under-glass, so err on the side of going too far. It takes about half an hour to cut through 4 mm glass.

When you are certain that you have gone far enough, remove the blank from the machine and clean it thoroughly of grit particles using plenty of water and dish-washing liquid. The central mirror must then be separated from the rest. The melting point of Araldite is rather higher than a domestic oven, mine at least, can achieve (another reason to use shellac). You will have to place it on top of a layer of sand or brass turnings on a metal tray and heat the underside of the tray until you see the glue beginning to bubble, smoke and melt. Then slide the components apart and allow them to cool.

You can discard all except the circular mirror, which now needs to have residual Araldite removed. This is easily done by placing the mirror face down in a shallow dish of acetone which you cover and leave alone for half an hour, when it will be found easy to separate the glue from the glass with the aid of a safety razor blade. Update: If you use shellac, it chips off very easily when cold and can be cleaned up with alcohol. The edges can be bevelled with a few strokes of a wetted diamond lap held in the hand. I have explained how to remove paint and silvering from half of the mirror and how to paint the back in the previous post in this category. Figure 3 shows the mirror blank before grinding and the end result, which now resides in one of Mr C Plath’s sextants.

Figure 3 : Before and after.


New Sextant Mirrors for Old

11 02 2009

Recently, when I mentioned that I restored sextants , I was asked if I resilvered their mirrors. I do, but only for antique sextants, when substituting  modern mirrors might conceivably affect the value. For others, as often as not, I substitute a modern mirror and carefully wrap the old mirrors to keep with the instrument, in case they later acquire significance.

In a recent post (How flat are sextant mirrors?), I pointed out that modern mirrors are made of float glass which, over small areas, is flat to within half the wavelength of green light and which compares well with the glass from a variety of sextants from as far back as the 1850s. Float glass is made by floating molten glass on a bed of molten tin.

There is a knack in cutting small pieces of glass which I have not yet acquired, but I have a friendly local glazier who will cut pieces of 3.8 mm thick mirror glass to size for me. He charges me about 50 US cents a piece. Then, in less time than it takes to write this post, I grind and bevel the edges. The longest part of the process is waiting for the paint to dry and harden afterwards. Here’s how it’s done.

It is now possible to buy a set of diamond-faced “sharpening stones” or laps for well under $20. You will need a medium (240 grit) and fine (360 grit) one, a shallow dish, a drop of washing-up liquid and some water. Fill the dish until the water just covers the medium lap and add a drop of washing up liquid.

Hold the mirror as shown in the next photo, at right angles to the lap and rub the mirror up and down the length of the lap to grind the edge. You don’t need to apply much pressure, just enough to keep the whole edge in contact with the lap. If you press too hard, you risk chipping the edge.

grind-edge

After about a dozen strokes, check to see that the edge is evenly ground and if it is, use a few strokes on the fine lap to finish off.  The next photo shows what it should look like. The unground edge, as cut, is on the right and the ground edge, seen frosted, is on the left. By the way, the black spots on my thumb are caused by splashes of silver nitrate solution, used in re-silvering glass.

grind-show

When you have completed all the edges, tilt the mirror so that its face is at 45 degrees to the lap and grind a bevel on the edge using the medium and fine lap. It needs a slightly different grip to stop the mirror rotating, shown in the next photograph. Make a smaller bevel on the rear surface, using only the fine lap, so as not to tear the paint and silvering. The purpose of grinding and bevelling, apart from neatness of appearance,  is to provide a seat for the sealing paint, to avoid sharp corners which will thin the paint film and to remove tiny chips and cracks from which strains and bigger cracks may start.

grind-bevel

Next round the corners. This needs yet another grip, shown in the next photograph. The mirror is held between the thumb, forefinger and middle finger and rotated in an arc by flexing and extending them. Move your grip to extend the arc until there is a smooth blend from the edges into the arc. In the example shown, all that I wanted was to remove a sharp corner, but some mirrors need relatively large radii on the corners if they are  to fit the mirror mount. This is quite easily done with this method; it just takes longer.

grind-corner1

Here’s the end result, ready to paint:

grind-finish

The paint has the very important function of preventing access of sea water to the silvering, so it is important that it extends around the edge of the mirror, well beyond the extent of the silvering. It seems pointless to go to this trouble and then allow the points of the adjusting screws to puncture the paint film. I interpose a thin sheet of brass. One manufacturer (Hughes and Son) sometimes cemented little discs of brass to the areas where the screws bore and another (Heath and Co) in their top-of-the-range sextants cemented a whole sheet of glass over the silvering, so that it was sandwiched between two sheets. Most either used nothing or an inadequate piece of card. When painting, cover the front of the mirror with masking tape and apply paint copiously, with special attention to the edges. All paints are porous to some extent, but the one shown in the next photograph seems better than most and, when fully cured after a few days, is very tough.

grind-paint

You’ll be surprised how easy it is after very little  practice.

Split horizon mirrors are done exactly the same way after removing the paint and reflective coating, using the original to judge how much to remove. Start by scoring with a safety razor blade, using a small square to guide the blade:

grind-score

Then use the blade as a mini-chisel to scrape off the paint in strips. Keep all your fingers behind the blade, as blood will rust it and you won’t be able to use it again:

grind-peel

You will find that much of the reflective coating comes off with the paint. Complete the job by standing the mirror upright in a beaker and pouring in concentrated hydrochloric acid up to the paint line. The acid is sold for etching concrete as “Spirits of salt”. Wear eye protection and plastic or rubber gloves to handle this nasty stuff, and cover the beaker, as it fumes in humid conditions and will rapidly rust steel tools in the vicinity.

grind-strip

After ten minutes, pull out the mirror and rinse in clean water. Rubbing with a thumb will rub off most of the film. Any that remains can have another ten minutes in the acid.

grind-half

When painting the backs of horizon mirrors, ensure that the paint overlaps the edge of the silvering a little, so that sea water cannot penetrate to it via the edge. Masking the plain portion of the glass with plastic insulating tape is the best way of ensuring a crisp edge to the paint.