Figure 1 shows that the sextant has a ladder frame, in this case of bronze, with a radius of about 162 mm. The paintwork had many chips and wrinkles. The index mirror is 56 x 42 mm and the half-silvered horizon mirror is 57 mm in diameter. There is the normal complement of shades. The fixed part of the release catch is formed integral with the perspex (Lucite) light guide, which showed signs of having been broken and competently repaired. There was no wiring between the battery handle and the lamp fitting, and the switch button was missing. The micrometer drum was yellowed and dirty. The micrometer mechanism was encrusted with dirt and old grease and oil. The original telescope (on the right in Figure 1) had plainly been dropped at some time, as there was a complex crack in the objective lens end of the body, the lens cement was crazed, as sometimes happens with a physical shock, and the lens was retained by an untidy mixture of glue and O ring material, the thread for the original retaining ring having been turned away.(Update 2016: I have since seen an intact version of this telescope and there was no retaining ring. The lens was simply glued into place.) It gave no usable image. Presumably at a later stage, another, higher quality telescope had been bought and the rising piece weakened by having a hole drilled in it, for the flat part of the locating vee and flat had broken off, so that this telescope too was unusable.
Features of interest
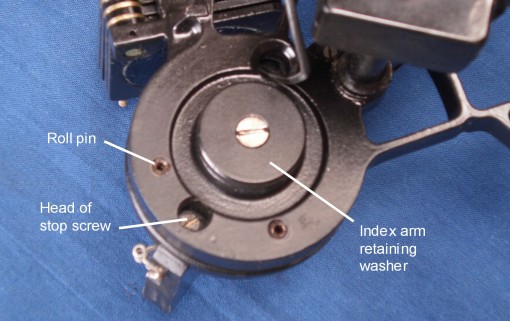
Index arm bearing: Almost certainly it was the great eighteenth century instrument maker, Jesse Ramsden, who originated the usual form of the index arm bearing, a tapered hard bronze shaft running in a brass bearing. This form of bearing is self-centering and easily adjusted for wear, though none ought to be expected in such a slow moving, lightly loaded arrangement. Until seeing this sextant, I had thought that only Freiberger Präzisionsmechanik and the makers of the SNO-T sextant (possibly one and the same) had used a parallel-bore bearing, but C Plath seem to have adopted the same practice by the 1970s, as production advances in micro-finished bearings advanced. Figures 2 and 3 show that the index arm shaft is integral with the index mirror bracket and is provided with a white metal sleeve (white metal is a heard-wearing form of bronze, high in antimony). The shaft runs directly in a bearing machined in the frame and is retained by a thick white metal washer secured by a single screw.
Ramsden seems to have used the very successful tapered bearing partly because of problems with stick-slip. A modern cylindrical bearing in this application needs to be made with a high degree of precision, so that clearances are both minimal and compatible with free running. An eccentricity of only o.002 mm can lead to a reading error of 10 seconds.
Limit pins and screw: Figures 2 and 3 also show how two roll pins are inserted in holes in the frame and a limit screw in the shaft casting, so as to limit the arc of movement of the index arm. This seems to me to be poor design. Quite apart from the suitability of using steel roll pins in a marine atmosphere, the force that causes the movement to be limited is at the end of a long lever arm, so that stress is unnecessarily applied to the index arm when it reaches the end of its range of movement. Most other sextants that have stop screws for the index arm have them logically placed at the ends of the limb. From a production perspective, two plain holes for the roll pins and a tapped hole for the limit screw is balanced by two tapped holes for stop screws.
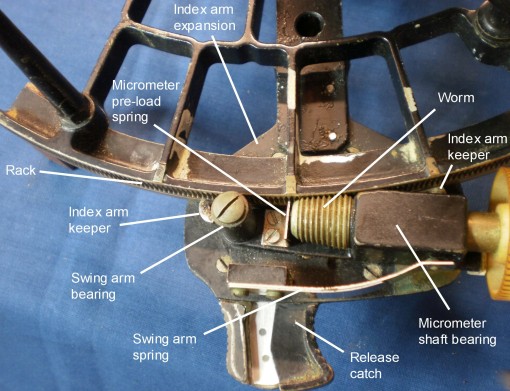
Index arm: The combined mirror bracket and bearing shaft or journal is united to the 20 x 2 mm aluminium alloy index arm by two countersunk screws (see Figure 2). At the lower end, the index arm expansion is attached by four screws, standard C Plath practice, whereas many other manufacturers made the whole in one piece. Figure 4 shows the lower end of the index arm with the light guide removed.
The screw at the upper left end of the release catch ends in a pin that passes through a vertical slot in the index arm and a horizontal slot in the swing arm (the slot in the swing arm is clearly visible in Figure 6, below), so that when the catch is operated, the swing arm and its attached micrometer mechanism swings out of engagement with the rack. Two countersunk screws attach keepers to the other side of the index arm expansion and these engage in a slot that runs parallel to the rack. They can be seen in part in Figure 5, below. The keepers prevent the index arm expansion from lifting out of the plane of the arc. Above each keeper retaining screw is a grub screw and lock nut. The tip of the grub screw has a pad of low-friction plastic material that bears on the arc, and the screw is adjusted so that there is no lifting of the index arm, and then locked with the nut. Other makers seem simply to have made the keepers so that they are of the correct size or, as in the Leupold and Stevens sextant described in my post “US Maritime Commission Sextant”, have split them to give an element of spring loading.
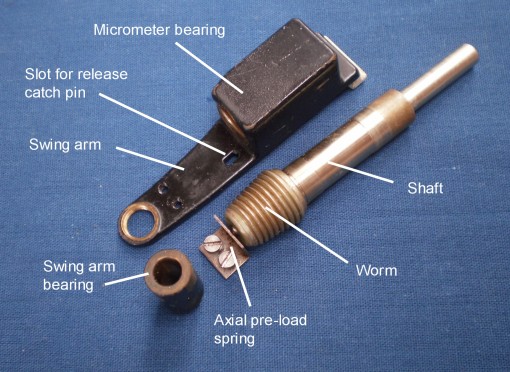
Micrometer mechanism : The mechanism as found is shown in place in Figure 5 and shown cleaned and exploded in Figure 6. The mechanism was originated by C Plath in about 1909 and followed by most other makers, especially Tamaya,whose first micrometer sextants were more-or-less exact copies of Plath instruments.
A swing arm that carries the micrometer worm bearing rotates around a bearing. A leaf spring bears against the swing arm to hold it in place against the rack and the release catch swings it out of engagement against the spring. The original Plath micrometer bearings were rather complex and must have involved a deal of hand fitting, but over time they have been simplified to the plain parallel bearing seen in Figure 6. An L-shaped spring bears on a ball bearing let into the end of the worm to provide axial preload, so that there is no end play when the micrometer is operated. The swing arm bearing must be removed from the swing arm chassis in order to extract the worm shaft from the inserted bronze bearing bush for cleaning and greasing.
The micrometer drum and its integral thimble is held in place by a single axial screw and is prevented from rotating on the shaft by a pin. In this example, the pin was not set correctly, so that when the sextant is set to a full degree on the scale, the micrometer drum reads about 10 minutes, rather than zero. It would probably have been better to omit the pin, as most makers have found that a screw alone is sufficient to prevent the drum from rotating on the shaft.
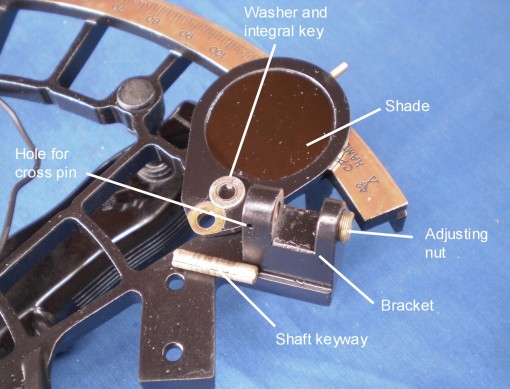
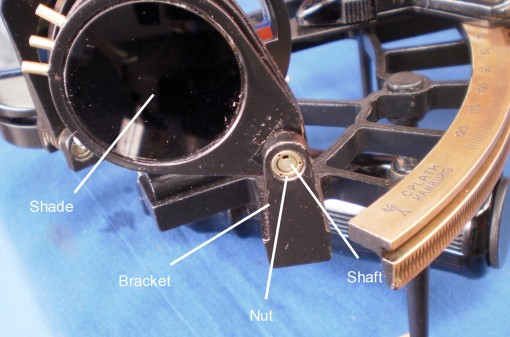
Mounting of shades : The shades themselves are in conventional brass mounts, but the method of attaching them is a little unusual and perhaps unnecessarily complex. The shades rotate around a shaft that is provided with a longitudinal keyway and which passes through a bracket cast integral with the sextant frame . It is held captive at one end by a cross pin, in this instance a steel roll pin, presumably to save on the cost of reaming for a brass taper pin. The shades are separated from each other and from the bracket by washers that have integral keys that prevent them from rotating, so that when a shade is rotated, its movement is not transmitted to its neighbour (Figure 7).
The shaft is carried in a threaded bush (I have incorrectly labelled is as a nut) at one end of the mounting bracket, and when the bush is screwed fully home it bears on the stack of washers and shades to provide a means of adjusting the amount of friction. The bush is rather unusual in that it is provided with three pin holes for rotating it. This may have given rise over the years to a deal of bad language, as presumably only those in possession of the special wrench needed can make the adjustment (Figure 8).
Switch and lighting : A trend with both Tamaya and C Plath has been to make the construction the of the battery handle so that it can be serviced only with difficulty, if at all. This example had no switch button or external wiring, and there was no obvious means of access to the switch. Eventually, I discovered by the application of a little brute force that the switch and a wirng socket had been glued into a transverse hole in the handle. The switch is a small item, rather difficult to illustrate, so I offer a sketch to guide others (Figure 9).
The spring-loaded switch button is held captive in a plastic moulding by a small screw. When the button is pressed, its head bridges the ends of two contacts that are in the form of elongated Ls, shown in red in the sketch. A wire leads from one contact to a transverse brass rod that forms the contact for the upper end of the battery and the other contact is wired to a brass slug that forms a rather basic socket. The plug for this was absent and so I made a semi-permanent connection between the socket and the lamp holder, as shown in the sketch. I also had to deconstruct the switch so that I could repair a broken contact, make a new button, find a new screw and spring and assemble them all on the bench, before rewiring and re-gluing the parts in place in the handle.
Damaged telescope : I managed to extract the lens from its mass of glue without damaging it. Older cemented doublet lenses are cemented with Canada balsam and can most safely be separated by slowly heating in a pan of water until, just short of boiling point, the two elements can be slid apart. The lens resisted this technique and I had to raise the temperature slowly in an oven, checking at frequent intervals until finally I could slide the elements apart. Once done, it is important to avoid thermal shocks to the lens elements by for example, placing them while hot on a cold surface. Once cooled, they can be cleaned up with xylene, often sold mixed with isopropanol for cleaning paint brushes, and re-cemented using a drop of Ultra-Clear Araldite, whose refractive index is very close to that of glass.
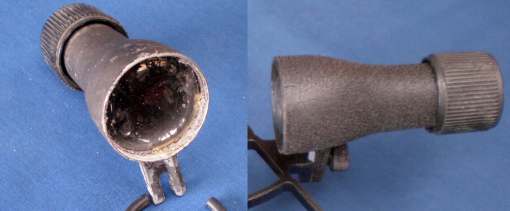
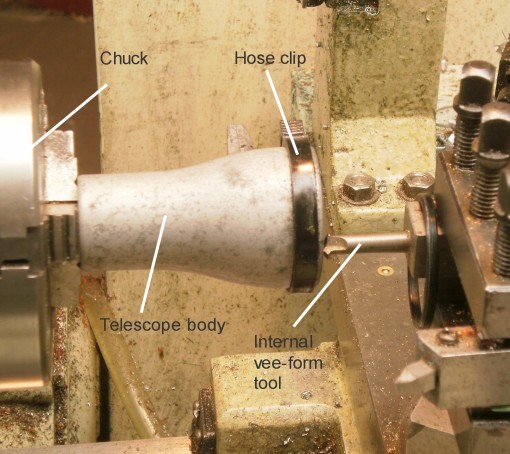
The end of the telescope body was cracked and the original internal thread had been removed, so that there was very little wall thickness left to accommodate a new locking ring. I ran a little superglue into the crack and clamped the edges together in the hope of preventing it from propagating any further. Figure 10 shows the before and after repair and Figure 11 shows the rather precarious set up for machining a new internal thread of 0.5 mm pitch. Novice turners may note the plastic hose clip, applied to reduce ringing and chattering.
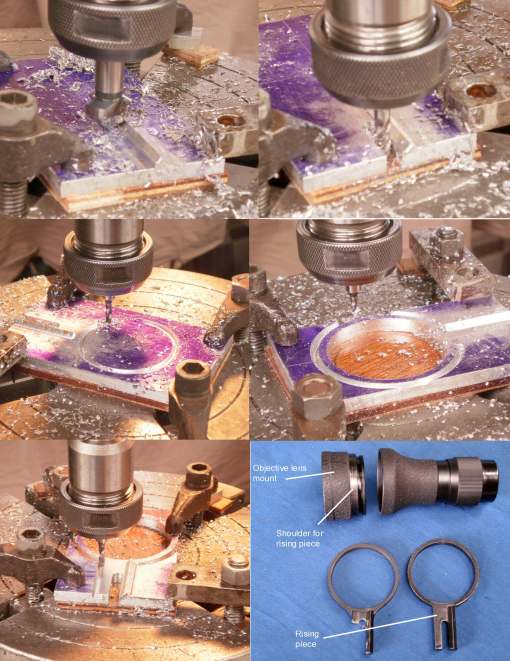
Machining new rising piece : The external profile of this could probably have been cut out by sawing and filing in the time it took me to set up a vertical milling machine to mill it out, but I had the time and so I elected to have a little practice. Many modern machine shops would simply feed a drawing into a computer and let the computer controlled machine do the rest, but I had to use my Mark I brain and eyes. Figure 10 shows the machining sequence I used and also shows the finished part, ready to be united with the telescope (left clicking on the figures allows you to zoom in and you get back to the text by using the back arrow). To save time and metal, the raised vee is a separate piece of metal attached from behind by three screws.
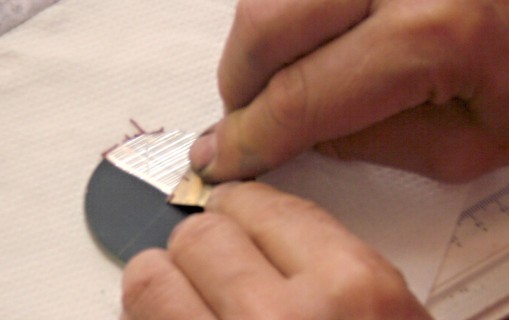
The rest of the restoration consisted of grinding the edges of the index mirror, cut from 4 mm float glass mirror stock, grinding out a circular horizon mirror, removing half the silvering (Figure 13) using a safety razor blade and hydrochloric acid, and sealing the backing with gloss enamel paint. After sanding off lumps and bumps from the frame paintwork and entirely stripping the index arm and other small parts, applying etching primer and a couple of top coats was relatively easy. For the latter, I use CRC Black Zinc paint out of a spray can (though it is available also in bulk). It gives a semi gloss finish very close to the original. The light guide required more care, as I was concerned that solvents in the paint might attack the plastic, so it had a coat of white acrylic primer and undercoat to give it some protection, followed by several coats of CRC Black Zinc. While it was possible to remove a lot of the encrusted dirt from the micrometer drum, it still retained a yellowish tinge and I could not restore it to a pristine whiteness. I understand that sunlight can sometimes bleach yellowed plastic, but will leave that to the new owner.
The case was in relatively good condition, on the inside at least, though the exterior varnish had perished in places. There were no pockets to hold batteries or the 1.5 mm AF allen key that serves to adjust the mirrors, so I used my feeble wood-working skills to make some, as well as one for the best telescope. I removed all the old varnish from the outside, applied several coats of shellac inside and out and finished by applying wax polish in the hope that over the next thirty-five years of its life it will acquire a pleasing patina. Figure 14 shows the appearance near the end of 2010.
The Nautical Sextant continues to get good reviews from buyers and others and there are still hardback copies available in New Zealand, from me if not from booksellers. Hints to a loved one might get you a copy in time for Christmas…





A spectacular restoration. The new owner must be delighted with the final result considering the initial condition of this instrument. Thank you Bill for sharing your experience with us, less gifted modest enthousiasts. Did you manufacture the special wrench needed to adjust the horizon shades set friction?
How do you grind a circular mirror?
J-P
Thank you J-P. Since it is unlikely I will ever need one again, I did not make a special wrench. Instead I used (or rather, mis-used) a pair of dividers. It worked, after a fashion.
To grind a disc of glass, mount a piece of tubing of the correct dimensions (internal diameter about 1 mm oversize), wall thickness about 1 mm, on a spindle and turn it true and square. Mount on a drilling or vertical milling machine and run at about 200 rpm. Protect the back of the mirror from the grinding paste with masking tape. Apply medium grinding paste (as used for regrinding valves) and kerosene or turpentine and patiently apply and release pressure until you have cut through. It helps to glue a piece of scrap glass to the face of the mirror to avoid splintering as the trephine (?) breaks through. I use a 1:1 mixture of rosin and beeswax as a glue as it is easy to clean off with alcohol. Allow for a little loss of glass on the periphery of the disc.
Bill
P.S. 27.12.11 I have since made a wrench, as I have acquired a similar sextant of my own. I used one of the nuts as a jig through which to drill holes for short pieces of piano wire in the end of a round bar. WJM
I Have this Sextant in the wooden Box, excellent condition.
What would be it’s selling price.?
It all depends, Jack, on the general condition, the state of the mirrors and shades, the case, how and where you sell it, and so on. I am not a dealer. I suggest you look at instruments on sale on e-bay for a few weeks and see what ones like yours sell for.